Protocol for deploying recorders for bioacoustic monitoring
Overview
This is an adapted version of a protocol for deploying, retrieving, and keeping track of the Sony ICD-PX370 recorders we use in our buzzdetect experiments. The original, lab-internal protocol was authored by Lilian Johnson. I’m publishing this version for other labs to use as a launching-off point for their own bioacoustics protocols. This protocol has been refined over many dozens of recorder deployments. Just as OSHA rules are written in blood, our protocols are written in the tears of experiments gone wrong. May our failures be your gain!
Setting up newly purchased recorders
Materials
Labels
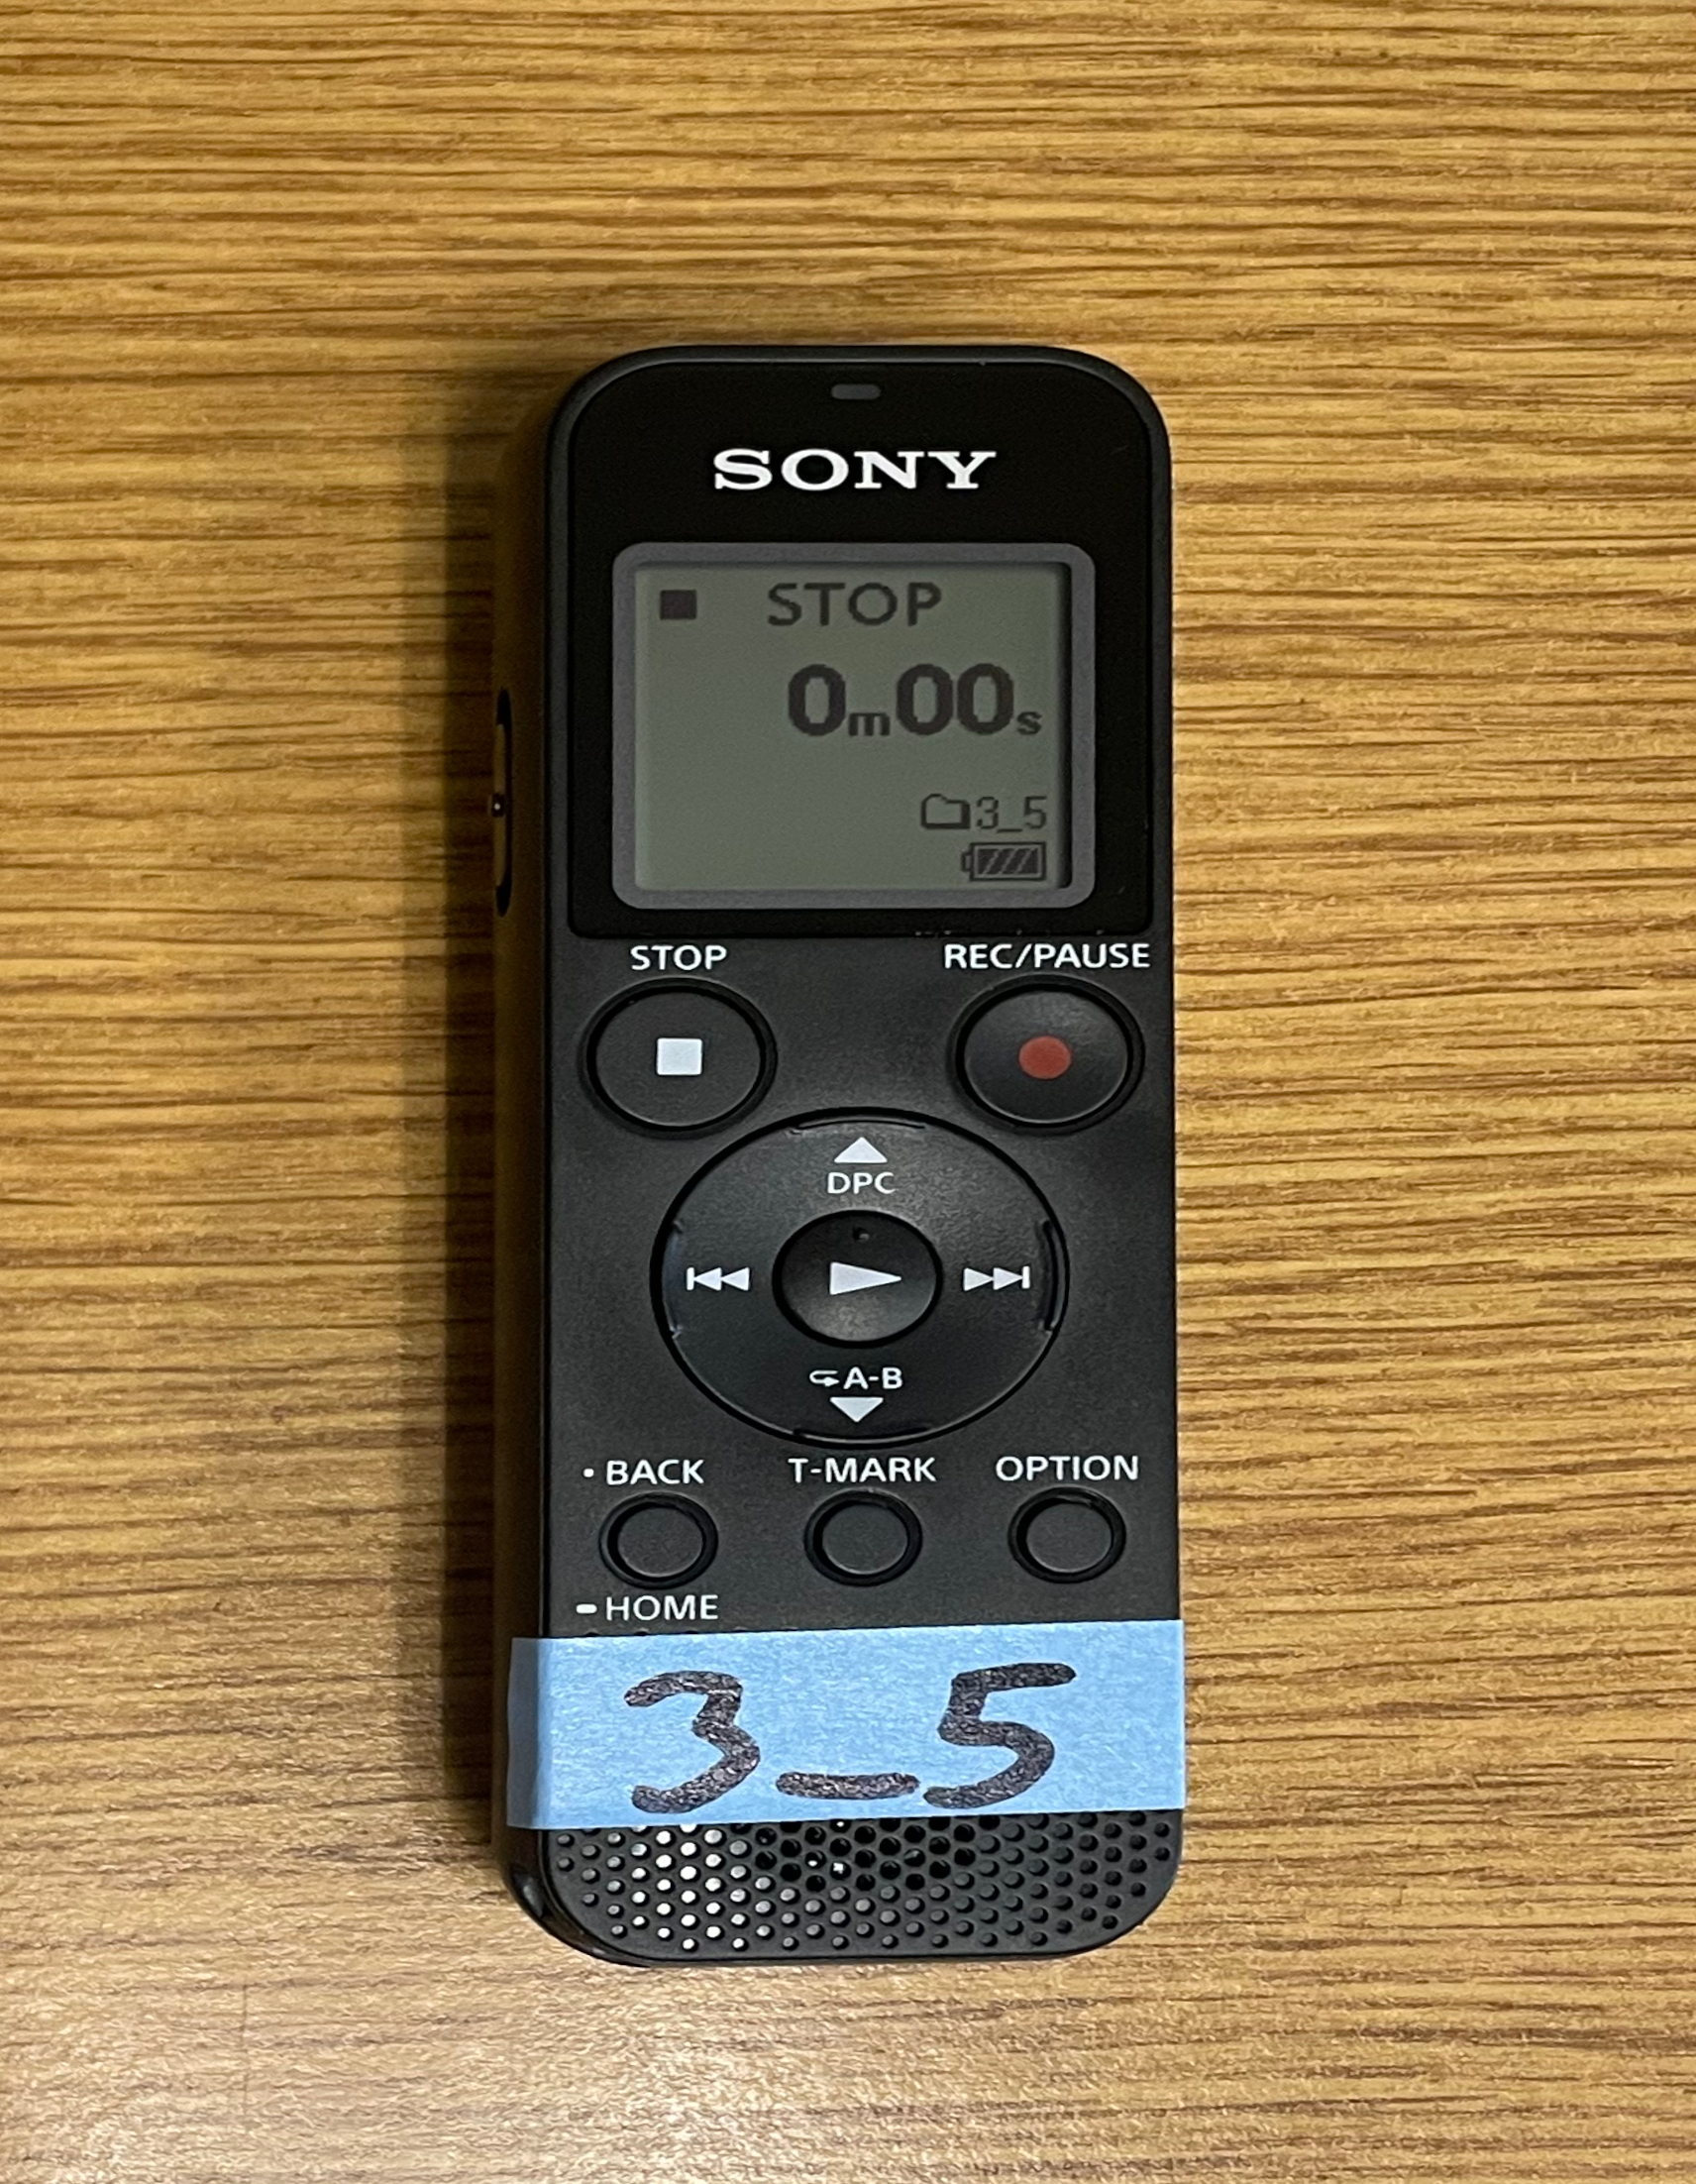
Every recorder needs a unique ID. IDs follow the format “[batch number]_[recorder number]”, e.g. the second recorder from the fifth batch of purchases would have an ID of “5_2”. Do not lead with the number 0 for the batch number OR the recorder number.
- Write the recorder IDs with permanent marker on labeling tape. Place the tape on the front of the recorder, over the speaker. This position allows the label to be read even when the recorder is strapped to a stake. The speaker is still audible when partially covered by tape.
- Add the new recorders to the recorder sign out sheet.
- Open the sheet
recorder count. Add your name and the date. For “type of change” put “purchase”. For “count”, put the number purchased. In the “recorder ID(s)” column, put the range of recorder IDs in this batch. - The
calendarsheet will recalculate the “total working recorders” value and update the calendar accordingly.
- Open the sheet
Settings
We record all of our experiments and our training data at 48 kbps MP3, which is a very low audio quality. Preliminary testing indicates that higher quality improves the detection sensitivity of our models. Higher quality may be especially preferable in noisy environments, where lossy MP3 compression can obscure buzzes.
There are a few downsides to recording high fidelity audio. Firstly, higher quality significantly increases data volume. Second, these recorders only have a puny 3.5 GB of available internal storage, so higher quality means more frequent trips to the field to change out recorders. At 48 kbps you can store ~1 week of audio on the recorder. At 128 kbps (the next step up in quality), you can only store 2.5 days. You can use MicroSD cards to expand your recording memory, but this also adds complexity and cost.
The optimum of this trade-off depends on the idiosyncrasies of your experiment. A short recording duration, a noisy environment, and low pollinator activity all favor higher-quality recording. Limited storage capacity, long duration, or high-replication experiments favor low-quality recording. From a statistical perspective, doubling your number of replicates is virtually guaranteed to lend more power than doubling the audio quality, though we don’t have hard numbers on the sensitivity gain from higher quality.
Insert 2 AAA batteries into each recorder and power the recorder on.
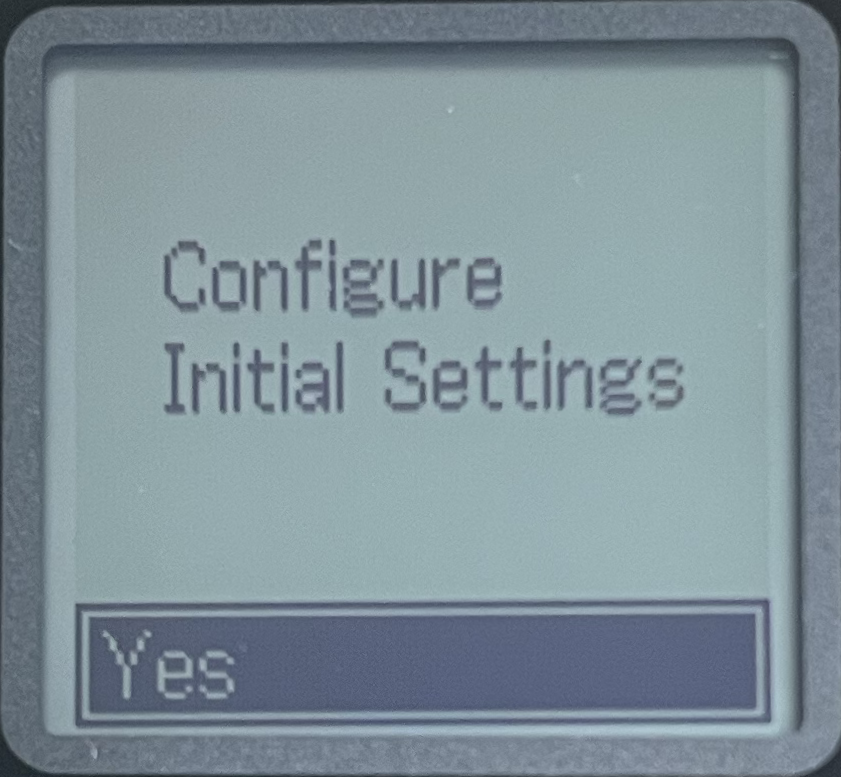
Upon powering on, a series of screens will prompt you to configure initial settings:
Select your preferred language
Set the date and time
- Turn beeps off, or you will go insane
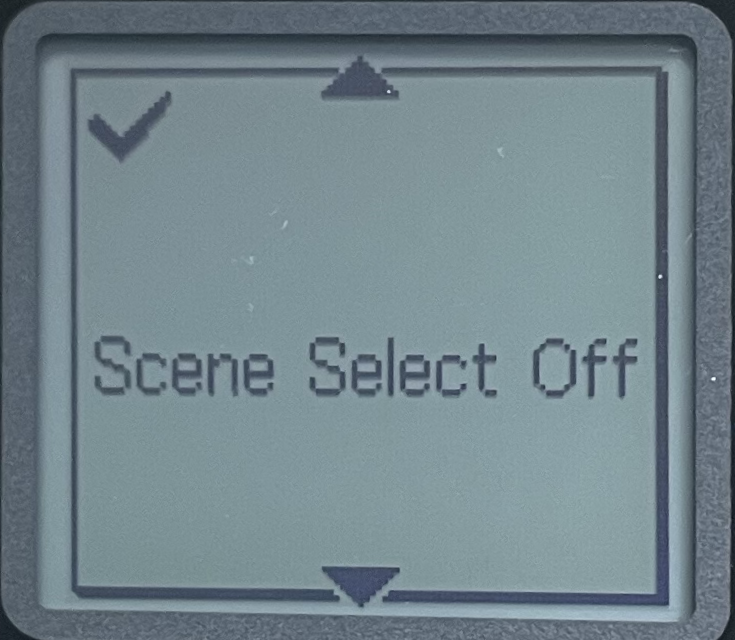
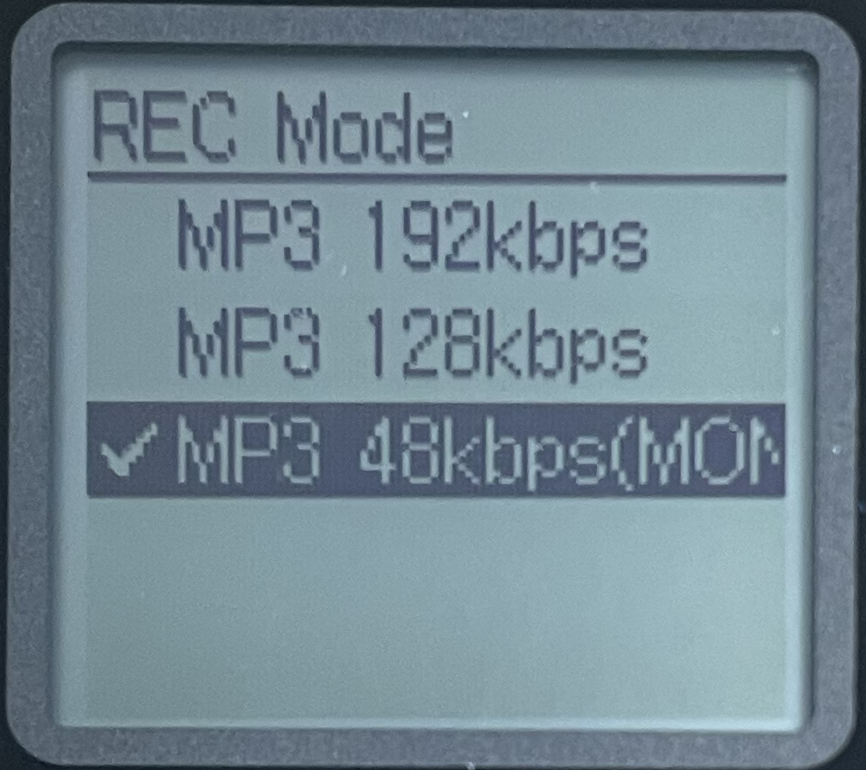
Navigate to Settings → Recording Settings and configure the following:
- Scene Select: off (Make sure to do this first, because changing it later will mess with your other settings.)
- REC Mode: 48 kbps (MONO)
- Built-In Mic Sensitivity: high
Navigate to Settings → Common Settings and select LED. Change it to off.
Setting the recording folder
Every recorder must be configured to record to a folder named with its ID. This makes file transfers much easier and allows you to identify a recorder even if external labels are faded or destroyed.
Plug the recorder’s USB connector into a computer and open the device in your file browser.
Open the folder REC_FILE. There will already be a folder here titled FOLDER01. This is the default recording folder. If you delete or rename this folder, the recorder will automatically recreate it, so just ignore it.
Create a new folder with a name matching the recorder ID.
Eject the recorder and remove it from the computer.
On the recorder, navigate to Settings → Recording Settings → Recording Folder → Built-In Memory. Change the recording folder from FOLDER01 to the new folder.
Deploying recorders in the field
The step-in fence posts and raincovers are designed for experiments where recorders are deployed near soft ground, e.g. in row crops or wildflower plantings. We have not yet developed methods for deploying recorders in urban environments or in tall trees. Let us know if you figure out a method for deploying in a different environment!
Recorder prep
Materials, per recorder
Steps
These steps are written as if setting up one recorder, but it’s far faster to set up recorders in large batches.
Sign out your recorders on the recorder sign out sheet.
Add 2 new AAA batteries to the recorder.
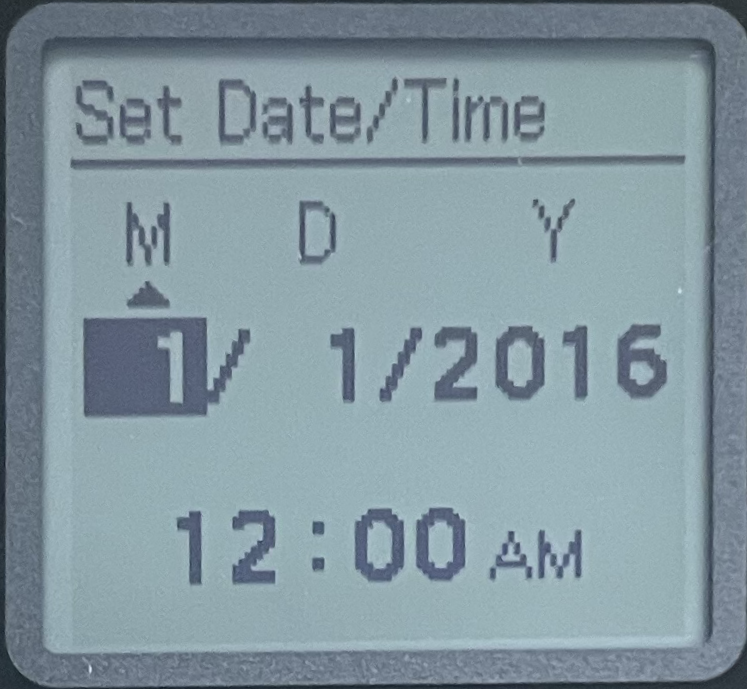
Turn on the recorder and adjust date and time.
Settings → Common Settings → Date & Time → Set Date/Time
You may or may not be automatically prompted to set date and time. Always check, whether prompted or not.
Date-time format defaults to
Month/Day/Year Hour:Minute AM/PM.Mind AM vs. PM errors. The AM/PM display cannot be changed directly - you have to scroll through the hours.
If the recorder is broken or any buttons do not work, set it aside with the other broken recorders. In the recorder sign out sheet, record a removal in the Sign Out Sheet.
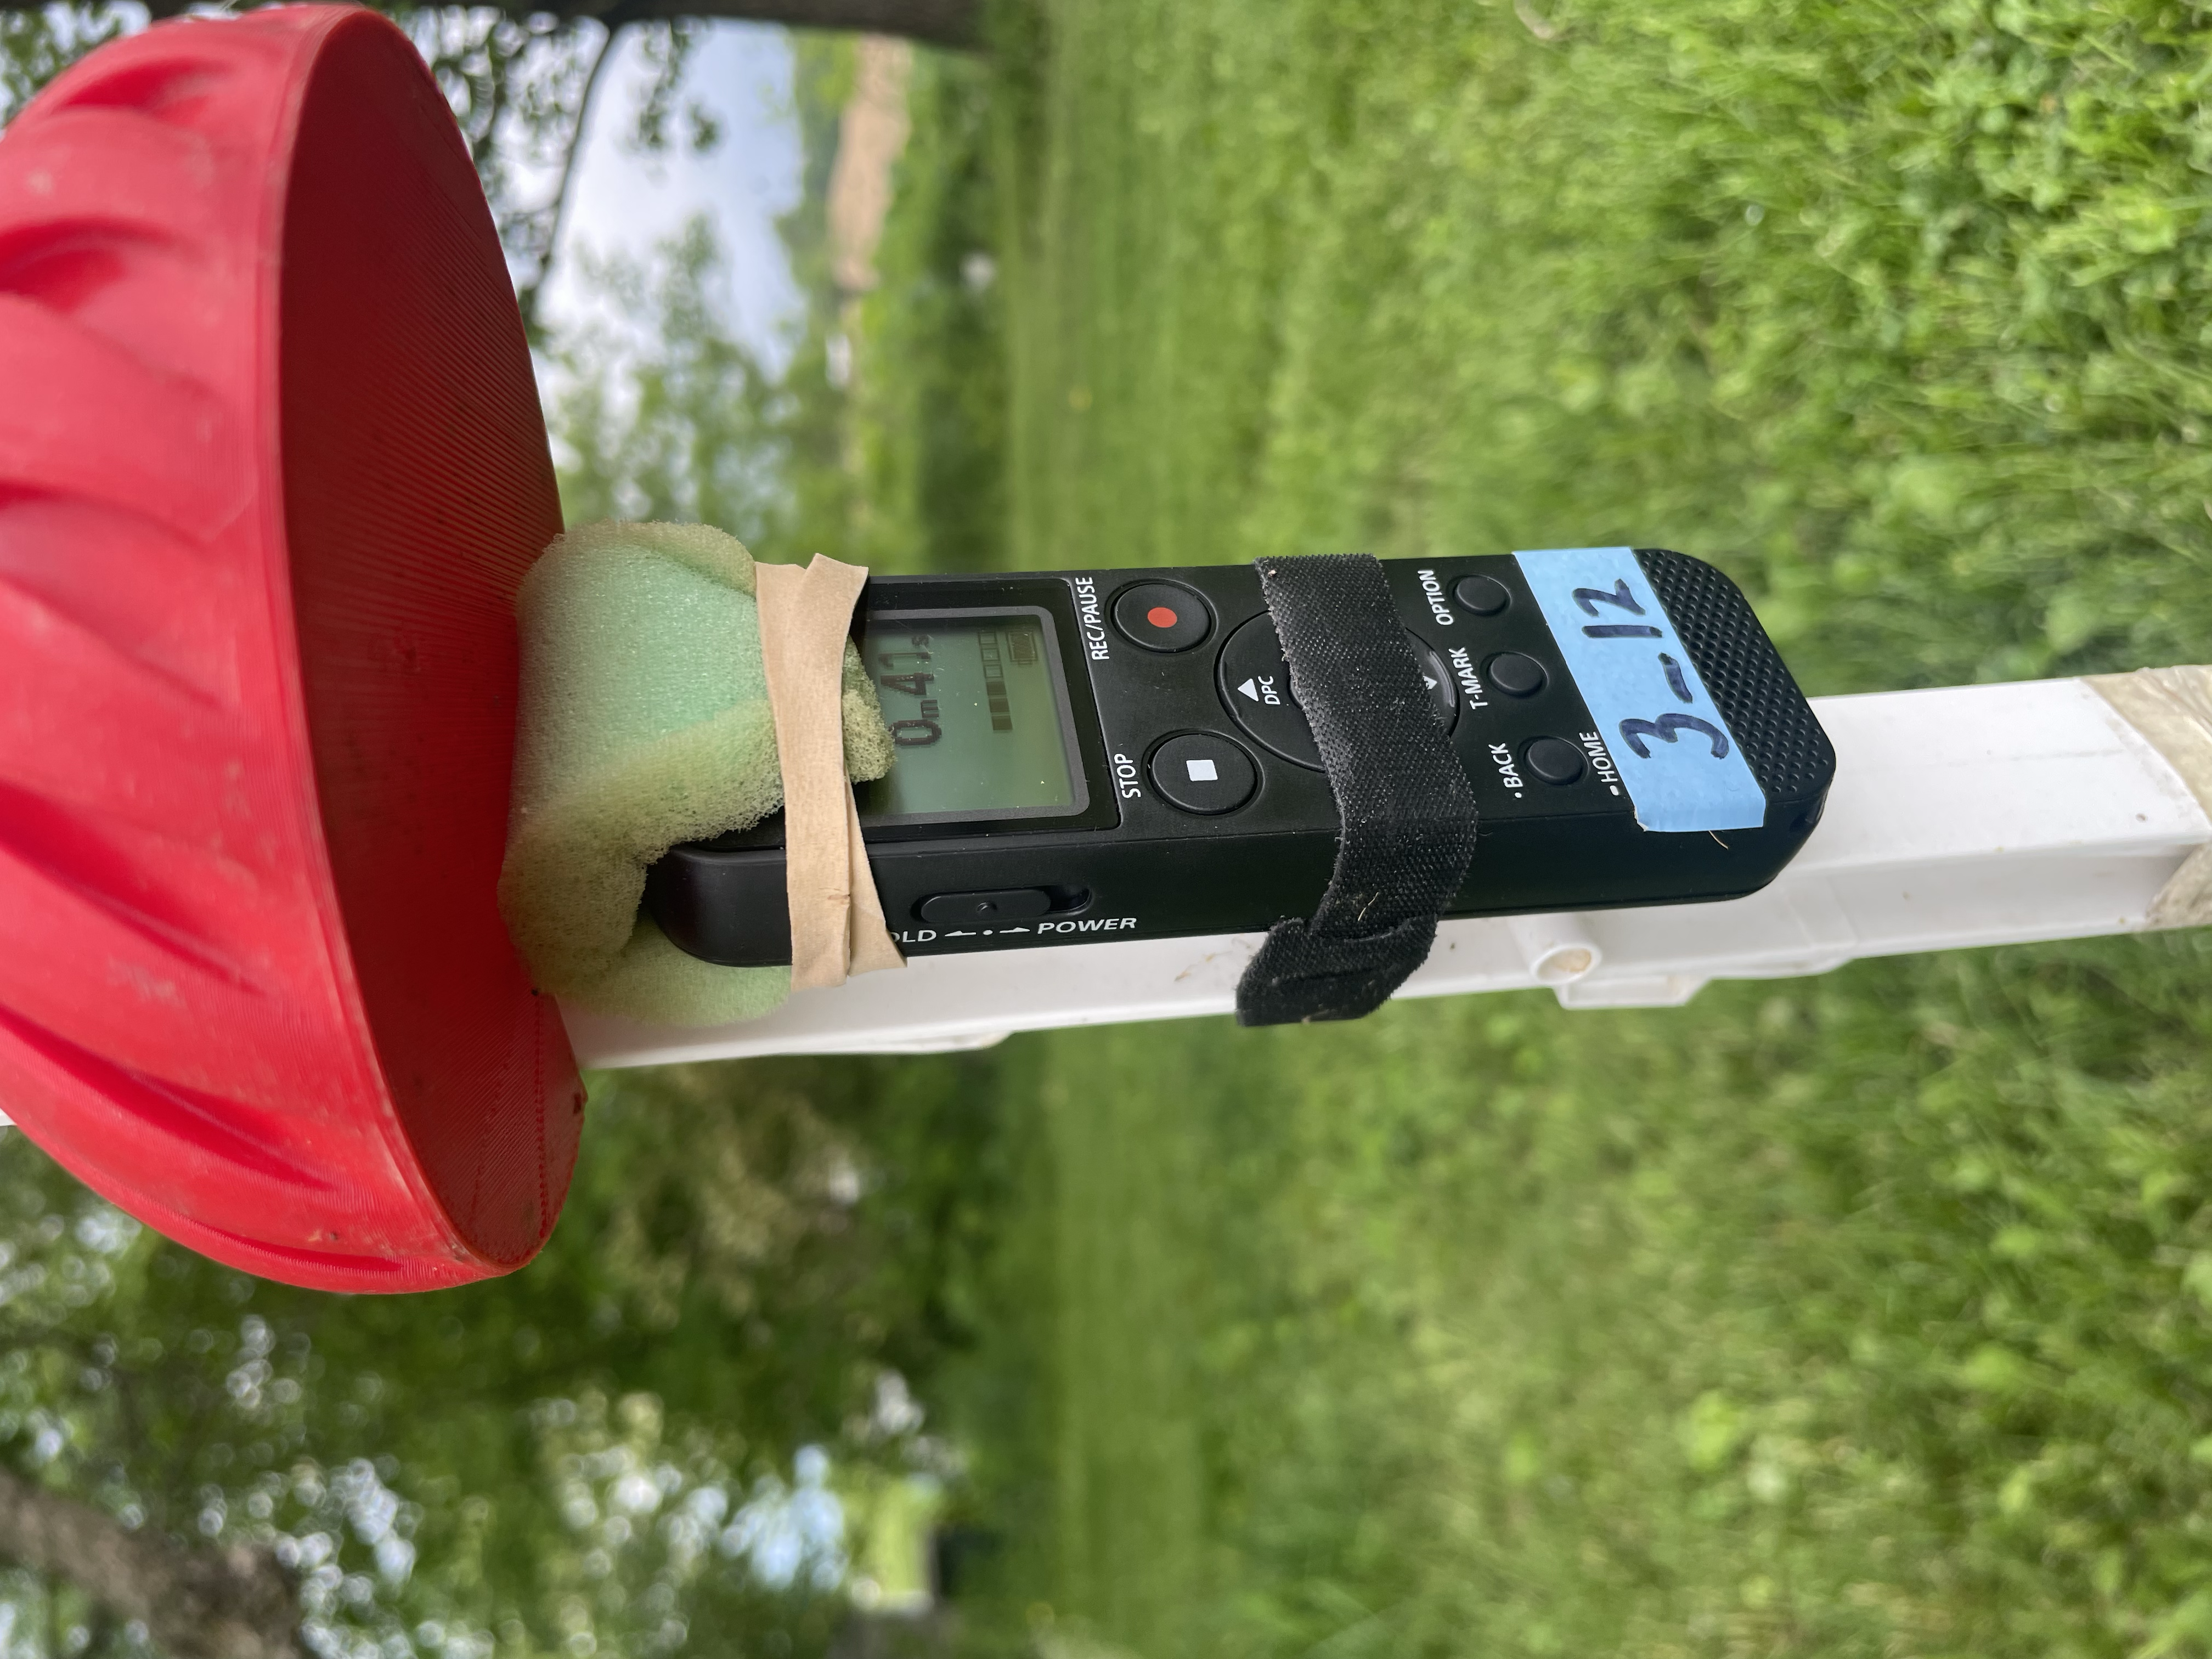
Cut out a 1”x2.5” piece of foam. Adjust the foam so that it covers the microphone at the top of the recorder, and fasten with the rubber band.
- The foam is sometimes picked at by birds, but generally lasts the entire season. The rubber bands degrade quickly in the sun and will often need to be replaced.
If you know the height at which you will be deploying the recorder, you can pre-load the stakes.
Using a Velcro strip, secure the recorder to the stake. Position the Velcro across the playback buttons so that the record button is exposed, the recorder ID is visible, and the power switch is accessible.
Clip the rain cover onto stake just above the recorder. The rain cover may slide down to rest on the recorder. This is OK, the audio will still be clear.
Recorder deployment
Materials
For all supplies, bring an extra ~10% in case of issues. E.g, if you’re intending to deploy 30 recorders, bring 33 recorders, 33 stakes, 33 rain covers, etc.
We use Procell PC2400 AAA batteries. Recorders using these batteries last 4.8 days on average, 4.9 median. Most likely, you will want to record during favorable weather, without precipitation or high winds.
While you want to minimize exposure to the elements, the recorders are surprisingly durable. We’ve lost 27 recorders in the last two years, during which time we clocked ~5,000 recorder-days of field recording. Most of these days had fair weather, but we have also subjected many recorders to torrential downpours and exposure to the elements for weeks on end. They’re troopers!
We usually prefer to drop partial days of data, so the day the recorders are deployed and the day they are retrieved (or run out of battery) are often not used in analyses.
Steps
If your recorders are not already affixed to the stakes, do so in the field.
Ensure the recorders are positioned at about the same level as the flower at which you are recording.
Turn the recorder on, press the record button, and immediately move the power switch to the “HOLD” position.
- When the power switch is in the “HOLD” position, button presses will not cancel recordings. If the recorder is not in HOLD, it is very likely that the recording will be canceled as the recorder and stake are handled.
Speak the fully identifying metadata into the recorder. This usually entails:
The recorder ID
The current date
The time of day
The name of the experiment, site, treatment, and replicate number
Speaking the identifying information at the start of the recording is very helpful if the recorder was set with a bad timestamp, the files are misplaced, etc. These errors happen more often than you would imagine.
Plunge the stake into the ground, ensure the rain cover is firmly attached, and let the recorder do the tedious work for you.
Retrieving recorders from the field
Ending recordings
After the recording period has ended, remove the recorders from the field and press the stop button. The recorder will take a second to save the current file, then return you to the recording screen. You can safely power off the recorder at this point.
- Don’t worry if the recording time on the screen does not match up with how long the recorder has been out in the field. The recorders can only handle files up to 0.99 GB (about 49 hours), so once a file reaches that threshold the recorder will save the current file and automatically start recording a new one.
- If the battery dies while out in the field, the recorder will still save the file it was recording when it died. The final portion of the audio may be corrupted, but buzzdetect has been designed to handle this. Results will be saved for the readable extent of the file.
- At our quality settings, the recorders can reliably record for 4 days, but can store almost 7 days (roughly 6d, 18h, 30m) of audio. Recording time can be maximized by replacing the batteries at day 3 or 4, then retrieving the recorders on day 7. Batteries can be quickly swapped in the field without needing to update date and time settings.
Uploading data
These recorders have very slow transfer speeds (7 MB/S!) and we often bring back dozens of recorders in a single trip. Manually transferring the files is a pain, even with a USB hub. To solve this, we developed filesync, a utility to mass-offload files from the recorders. Paired with a USB hub, filesync lets us offload files from large batches of recorders automatically. It can pick up dropped transfers (the connections can be finnicky), syncs to multiple destinations, and automatically removes the files from the recorders after verifying that they’ve been successfully copied. It’s great, but unlike the other tools our lab has developed, it’s very much hard-coded to our particular hardware and protocols. We’ve made the repository public so that other researchers can take inspiration (or take code) from filesync, but it will almost certainly not be a plug-and-play solution. Let us know if you would find a general-purpose filesync valuable.
- Launch filesync and navigate to the experiment directory
- Create a new folder, named in the ISO-8601 format (YYYY-MM-DD) for the date the recorders were deployed
- buzzr can automatically pull the date-time information from the filenames, but naming a folder according to the date recorders were deployed makes it easier to catch timestamp errors and is a logical unit for one round of uploading.
- Sync all recorders
- Upload the audio files to the remote file storage using Rclone
- The general pattern is
rclone copy '/local/path/to/experiment' 'remote:/remote/path/to/experiment' --no-update-modtime -v --progress - Before the actual upload, test the command with
--dry-runto make sure everything looks right
- The general pattern is
Tracking recorders with the Recorder Sign-Out Sheet
Automation makes it easy to scale up passive acoustic monitoring on the software side, but at the end of the day, you still need to wrangle dozens-to-hundreds of recorders. Our lab has multiple graduate students and undergraduates conducting simultaneous experiments, so we needed a way to organize our recorder count and reserve recorders on a calendar. This produced a spreadsheet we call the Recorder Sign-Out Sheet. A demo version of the sheet is available here. Feel free to copy and modify!
Sheet: calendar
The calendar sheet gives a projection of available (that is, not reserved for any particular experiment) recorders in the next ~100 days, written as a number underneath each date. Updates to the recorder counts or sign outs will automatically propagate to the calendar. On any days where fewer than 10% of the stock of recorders remains, the available recorder count is orange. When the stock is below 0 (that is, more recorders have been signed out than exist), the count is red and bold.
This sheet should not be edited; it is completely generated by functions.
On the right hand panel is a quick summary of the state of the recorders.
“Recorders overdue” shows the count of recorders that have been reserved for an experiment (see sheet sign out) but the “returned” box has not been checked. These recorders are assumed not to be available.
“Most recent recount” shows the last time a full recount was made of available recorders. If it has been a while since the most recent recount, the estimate of total available recorders may be off.
“Total working recorders” is an estimate of the total number of functioning recorders in the lab’s possession, not accounting for any signed out recorders. It is calculated by taking the number from the most recent recount and adding every change in recorder number (new purchases, removing broken recorders) since that date.
Sheet: sign out
This sheet is straightforward; the researcher responsible for an experiment reserves recorders by writing the first and last dates the recorders will be needed (inclusive on both ends) and the total number of recorders needed. Rows for finished experiments are colored in gray. Finished experiments can be deleted without affecting any calculations. Rows for ongoing experiments are colored in blue. Rows for future experiments are black. Experiments with overdue recorders (“date in” has already passed, but the checkbox for “returned?” hasn’t been selected) are red and bold. The “notes” column can be used to record anything that may be relevant to the planning of your labmates.
Sheet: recorder count
This sheet tracks the changes in the total number of recorders across time. The first four rows from researcher “Brutus Buckeye” are examples.
We track four types of changes in recorder counts, but only one (recount) is specially handled.
Purchase: for when a brand new batch of recorders is ordered. Include the range of IDs in the batch, e.g., 1_1–1_135.
Addition: for when recorders are found that were not accounted for in the previous recount. In this case, the total recorder count needs to be updated, even though no new recorders were purchased. For example, if a dozen recorders were discovered behind the seats of the lab vehicle after an audit was done, they would be put in this sheet as an addition to update the number.
Removal: for when recorders are permanently removed from the stockpile. Most often because they have broken. Including the ID can be valuable in case data from previous experiments was affected. Record removals as a negative number, leading with a minus sign.
Recount: this is the only category that is specially handled; the estimate of recorders available on the calendar is calculated by looking for the latest recount in this sheet. A recount is when every available recorder is inventoried and checked for functionality. The number entered here should be the total number of recorders available and working. So, if the current estimate of recorders is 100 and a recount discovers that only 90 recorders are functional, the number in the “count” column should be 90.